How to Make Shrink Plastic Earrings and Pendants (Step-by-Step Tutorial)
- Davena

- Dec 13, 2025
- 6 min read


💖What You'll Need💖


Materials:
● Shrink plastic sheets
●Paint markers in light colors (any brand works)
●Sharp scissors
Tip: Smaller craft scissors work much better than large kitchen scissors for cutting intricate shapes
●Your design (printed out, on your phone/computer, or just in your head if you can freehand it)
●Hole punch (optional - only if you don't have a mini drill) I prefer to drill holes afterwards, but punching before shrinking works too
●Sealer (acrylic gloss, resin, or any permanent sealant)
Tools:
●Heat gun (a cheap one works fine - doesn't need to be expensive) You CAN bake shrink plastic in the oven, but a heat gun gives you way more control.
●Something flat and light to hold it down (I use a ruler, but anything that helps you flatten it at the end works)
●A flat, heat-safe work surface.
If using a heat gun on plastic or wood tables, move your piece every minute or so to avoid overheating any one spot - plus, it'll want to move around anyway as it shrinks
Step 1: ✏️Draw Your Design✏️

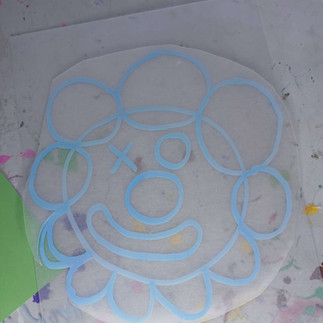
Place your shrink plastic sheet over your design and trace it. Since shrink plastic is see-through, you have lots of options!
Ways to create your design:
●Phone/tablet: Zoom in on your design and trace directly on the screen, moving the image around as you follow the lines
●Computer/laptop: Same method - display your image and trace over the screen
Printed picture: Just lay the shrink plastic on top and trace
●Freehand: Draw directly on the shrink plastic - no reference needed! Just let your creativity flow
✨️Making matching earrings?✨️
Draw your first piece, let the paint marker dry (only takes a few seconds), then place a second shrink plastic sheet on top and trace over your first drawing. This gives you nearly identical pieces without having to draw the same design twice!
⚠️Important sizing tip: Remember that shrink plastic shrinks down significantly (how much depends on the brand). Make your design BIGGER than you want the final pendant to be. I like big statement pendants, so I often fill up half the page or even the entire sheet depending on the shrink plastic size.
For this tutorial, I'm making one of my simple clown face designs- an few others.
Why use light-colored paint markers?
Light colors make it easy to layer and paint over later - the colors underneath won't show through once it's melted and finished.
Step 2: Cut Out Your Design

Now it's time to carefully cut out your design. This step is fairly straightforward, but here are some important tips:
Cutting intricate shapes:
Turn the paper, not the scissors - When cutting detailed curves or tight corners, rotate the shrink plastic sheet carefully as you cut
Take your time - For tricky spots, cut into one corner, turn the page, meet it from the other direction, then carefully snap off the excess piece.
Can't reach a tight corner? Just cut a silhouette around it instead
Detailed vs. silhouette cutting:
I prefer to cut very detailed, precise outlines - I think it adds more visual interest to the final pendant. But lots of people just cut silhouettes around their designs, and that works perfectly fine too! It's totally up to your skill level and preference.
Optional: Punch your hole NOW (before melting):
If you're using a hole punch instead of drilling holes later, punch your hole now while the plastic is still flat and unmelted. Remember: the hole will shrink down along with everything else!
Important warning:
Shrink plastic snaps VERY easily before it's melted. Be careful! If you accidentally make a tiny snap or cut slightly too far, don't panic - a lot of times when you melt it down, those tiny spots melt back together on their own. Once it's melted and cooled, your piece will be very sturdy and durable.
🩷Don't get frustrated! This part takes practice. Your hands will get tired if you're cutting out a lot of pieces. Take breaks if you need to.🩷
ONCE THEY ARE ALL CUT OUT ITS NOW TIME TO DO THE SHRINKING!!


Step 3: The Fun Part - Melting and Shrinking:
This is where the magic happens! You can use an oven OR a heat gun - I prefer a heat gun because it gives you way more control.


Oven Method:
Place your piece on a baking sheet with parchment paper on top to help prevent it from sticking together. Follow your shrink plastic brand's instructions for temperature and time.
Heat Gun Method (My Preferred Way)
The Process:
Start heating around the outer edges, gradually working toward the center.
Keep the heat gun moving - don't stay in one spot or you'll melt a hole through.
Move your piece around in circles as you heat.
Don't panic! Your piece will warp, curl, and look absolutely terrible during shrinking. This is NORMAL. Trust the process.


Note: Plain circles are the hardest shape because they have no corners - the edges curl inward. Intricate designs are actually easier!
My Flattening Technique (something I figured out on my own):
Good news: You CAN reshape shrink plastic after it hardens if you're using a heat gun!
Move the heat gun up and down over the warped area (never stay in one spot)
Watch for it to get soft - it'll look slightly clearer, almost like it's wet
Pull the heat gun away and quickly flatten with your ruler
Hold the ruler down with heat gun pointed away - let it cool flat
Flip and repeat on the other side
Work back and forth until the whole piece is flat and smooth
Tips:
Be gentle with the ruler - don't poke corners into the soft plastic
If your piece slides around, turn the heat gun away, reposition, then heat again
Check the back for bubbles and flatten those out too!
Remember- this takes practice!
It's OKAY to get frustrated. It's OKAY to mess up your first few pieces - I can't tell you how many times I messed up when I first started! I still mess up sometimes even now. But once you get the hang of it, this becomes simple and easy. I do shrink plastic this way because the end result is much more vibrant, colorful, and professional-looking than other methods. New skills take practice!
When is it done?
Your piece should be flat, sturdy, and nothing should be shrinking anymore.
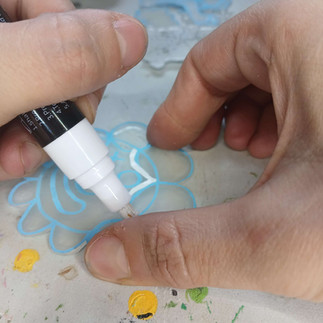
Step 4: Paint and Color Your Design
The hardest part is over - now it's time to have fun with color!

What you can use:
Acrylic paint (my preference)
Paint markers/acrylic markers- Doesn't Have to be expensive on brand paint markers either!
What DOESN'T work well:
Colored pencils (won't adhere properly to the shrunken plastic)
Crayons (also won't work well)
For a vibrant, professional, beautiful finish, stick with acrylic paints or paint markers.
How to paint:
This part is totally up to you! You can:
●Paint the whole thing in base colors first, then add details after
●Carefully paint around your traced lines if you have an intricate design
●Layer colors however you want
☆Get creative - there's no wrong way to do this step!
ONCE ITS ALL PAINTED ITS TIME TO SEAL IT!


Step 5: Seal Your Piece :
Once your paint is completely dry, it's time to seal and protect your work!
What sealers work:
Acrylic sealer (my go-to - I use this brand-it works good and is afforable.


Resin (follow resin-specific instructions)
Mod Podge - only if this is just a fun craft project
Note about Mod Podge: It works in a pinch, but it doesn't last very long. It's better for paper collages than wearable jewelry. If you want your piece to be durable and long-lasting, use an acrylic sealer or resin instead.
How to seal:
Apply a thin layer of sealer with a paintbrush (or however your sealer applies)
If you punched a hole earlier: Be careful not to fill up the hole with sealer
Let it dry completely
Want extra gloss? Add another layer once the first is dry
Set it somewhere clean and dust-free while it dries
That's it! This step is simple - you're just painting clear gloss over your finished piece.
Step 6: Drill Your Hole (If You Need One)
If you didn't punch a hole before melting AND you need a hole for jewelry hardware, now's the time to drill one with a mini drill.
Note: Skip this step if you're making a hair clip, magnet, or anything that doesn't need a hole!
Important: Shrink plastic can melt from the friction of the drill bit, so work quickly!
How to drill:
Position where you want the hole
Poke the drill through quickly - don't take forever.
Pull it out immediately
If the drill bit gets stuck: Turn off the mini drill and carefully pull the piece off without snapping it.
This step is quick and simple - just remember that speed is key to prevent melting!
And that's it! Your shrink plastic pendant is done and ready to turn into jewelry, a hair clip, or whatever you want!


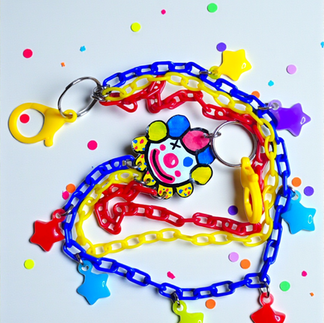
You Did It!
Want to turn your pendant into earrings, a necklace, or a hair clip? Follow my blog for more tutorials, or check out my YouTube (@fearlessandfrosted) for video tutorials!
Find me on all platforms: Fearless and Frosted


Comments