How to Use Molds with Polymer Clay
- Davena

- Jan 14
- 4 min read
Watch my video tutorial or read step by step instructions below!
Ever struggled with getting polymer clay out of molds without fingerprints all over it? Or had pieces break during demolding? When I first started working with polymer clay molds, I had the same problems. Today I'm sharing the tricks I've learned to make perfect molded pieces every single time!
In this tutorial, I'm making severed finger barrettes, but these techniques work for ANY polymer clay mold project - whether you're making earrings, charms, embellishments, or anything else.

What You'll Need
Polymer clay (any brand that works for you)
Silicone molds
Rolling pin or acrylic roller-really can use anything! (I started off with a children's playdoh roller)
Flat work surface
Parchment paper
Cleaning spray
Acrylic paint
Varnish (I use gloss varnish)
B-7000 glue (if you're going to make these into hairclips or pins!)
Hair barrette clips/pin base
Access to a freezer (trust me on this!)

Step 1: Prep is EVERYTHING
Before you even touch your clay, clean your workspace with cleaning spray. Get all pets out of the room - cat hair and polymer clay are not friends. Then wipe down your hands with isopropyl alcohol. This removes oils, dust, and any debris that would otherwise end up embedded in your clay.
Pro tip: Keep the alcohol nearby and wipe your hands periodically while working!

Step 2: Roll and Cut Your Clay
Roll out your polymer clay until it's nice and even. The thickness depends on your mold depth, but generally you want it flat and consistent.

Now here's the key: cut your clay to match the shape of your mold cavity. For my finger molds, I cut long rectangular strips. If you're using circular molds, cut squares or circles. This makes fitting the clay into the mold WAY easier.


Step 2: Prepare Your Mold
Open up your silicone mold WIDE. Don't just crack it open a little - spread it out wide. This makes it so much easier to work with and helps prevent air bubbles.

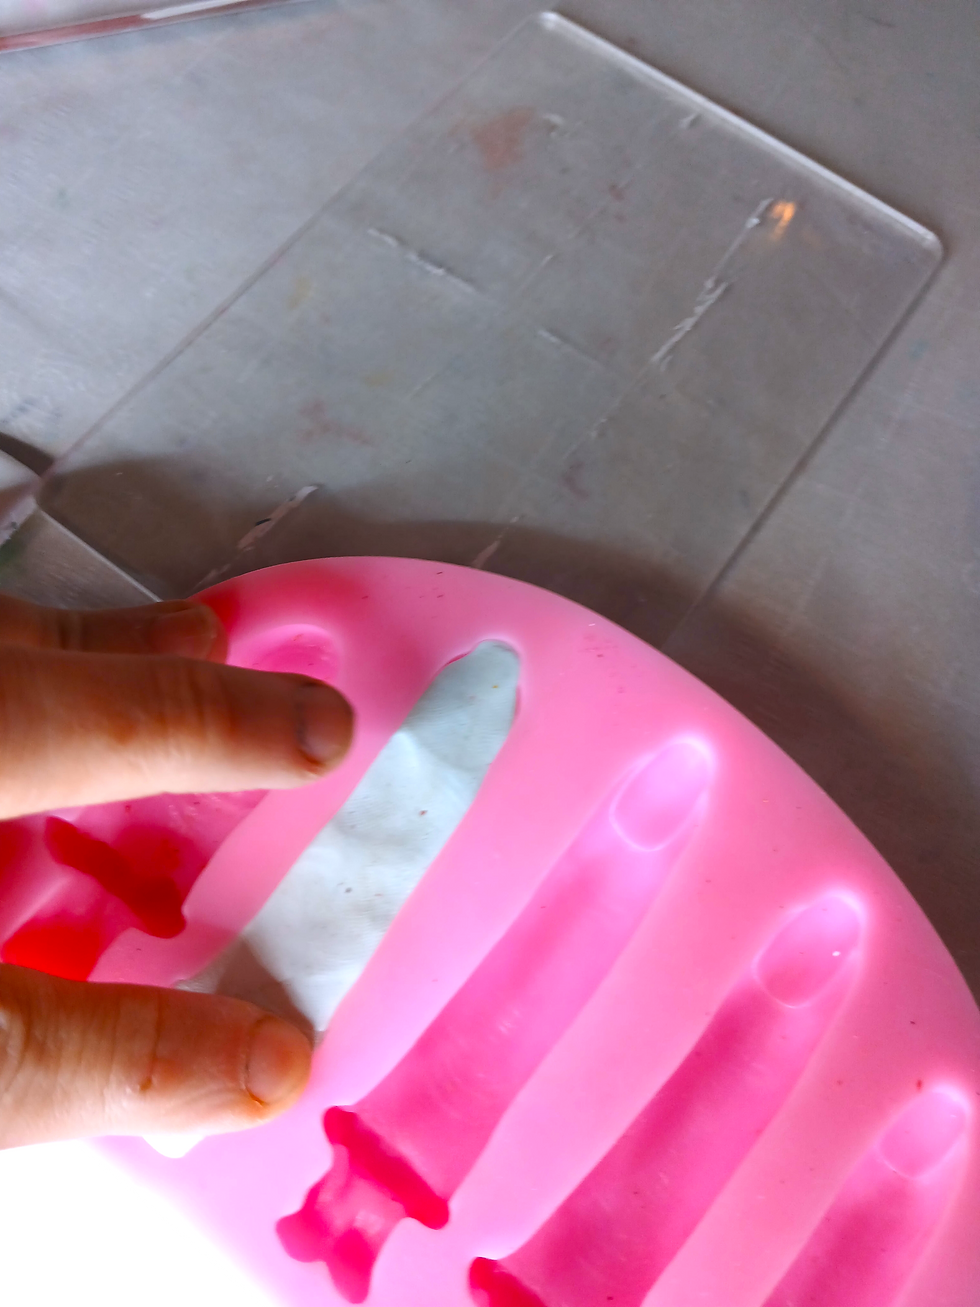
Step 3: Press Clay Into the Mold
Bend your clay piece and press it into the mold cavity. Pat it down firmly and work it into all the details. If you have too much clay bunching up in one area, knead it and work it toward areas that need more. If you have excess, just pinch off a little piece and remove it.
Step 4: Roll It Smooth
Take your rolling pin and roll over the back of the mold repeatedly. This ensures the clay fills every detail and creates a flat, even back surface.
Check the edges - even if it looks flat, there might be excess clay hanging over the edges. Remove this carefully with your finger, then roll again.

Step 5: The FREEZER TRICK (Game Changer!)
Here's the secret that changed everything for me: Pop your filled mold in the freezer for 5-10 minutes.
This firms up the clay just enough that it pops out cleanly without:
Fingerprints
Stretching
Tearing
Distortion
Don't leave it in too long though! If you forget about it and it gets too cold, it can snap or break. But if that happens, just let it warm back up to room temperature and try again - it'll be fine.
Real talk: I usually aim for 5 minutes but sometimes get distracted and leave it for 10. That's pushing it, but it still works!
This is the time I get some water or take a bathroom break!

Step 6: Demolding
After your freezer time, carefully flex the mold and pop out your clay piece. It should release easily with all the details perfectly intact and no fingerprints!
Step 7: Baking
While you're waiting for pieces to chill, lay down some parchment paper on your baking pan. Once demolded, place all your pieces on the parchment paper.
If you have curved clips, bake the clay on the clip so it hardens to the curve of the clip!
Bake according to your clay's specific instructions. Every brand is different, so follow the package directions!
Step 8: Painting
Once your pieces are baked and cooled, paint them however you want (unless you used pre colored clay of course! I painted these severed fingers in pastel colors for a creepy-cute aesthetic.

Step 9: Sealing
Apply your varnish (I use gloss varnish for a finished, professional look). This protects your paint and gives everything a nice shine. Some people did there clay completely in the varnish and hand it to dry, other paint it on. the more layers the glossier it will be!

Step 10: Assembly
Using B-7000 glue, attach your finished pieces to hair barrette clips. This glue is flexible when dry, which is perfect for wearable items but you can also use E6000 glue as well!

Let the glue cure completely before wearing!
Final Thoughts
The freezer trick seriously changed my polymer clay game. No more fingerprints, no more stretched details, no more broken pieces. It's such a simple step but makes a huge difference in your final results.
What polymer clay struggles have you had? Drop a comment and let me know what tutorials you'd like to see next!
Want to see more of my work? Check out my shop for handmade alternative jewelry and accessories!


Comments